Standard result set
In order to generate a result set report, you must first create a Standard result set and calculate it.
In the Result Sets explorer, select the folder where you want to create the result set. Then click the
Add  button on the ribbon and select
Result Set. Note you can add folders (and sub-folders) to organise result sets by selecting
Folder in the drop-down menu.
button on the ribbon and select
Result Set. Note you can add folders (and sub-folders) to organise result sets by selecting
Folder in the drop-down menu.

The New Result Set dialog will open.

Enter a name and click OK. The new result set will then appear in the Result Sets explorer and will automatically open in a new tab.
Note: Result Set names must be unique and the dialog will not accept a name that is already in use.
Calculation Hierarchy and project selection
Select the hierarchy to be used, and the projects that you want to be included using the Calculation Hierarchy:

The Calculation Hierarchy has a context menu (accessed using right-click at a node folder) which allows you to Expand or Collapse the view of the contents of the node.
You can apply a project filter by selecting a filter name from the dropdown list (no filters are set up by default, select <No Filter>
to remove any filter). This will filter the
projects that are included in result set calculations, based on variable values. To add or edit the available filters in
the Project Filter Manager dialog, click the Manage Filters
button  on the ribbon:

Note you can enter search terms in a variable name field to match any part of a variable name. You must click the Save button inside the dialog to save editing changes for filters.
For version 16.5 Update 7 and later: You can use the Permissions button in the Project Filter Manager dialog to edit access permissions for a filter, based on workgroups and users. When a filter is created, 'Full Access' permissions are granted to the user who created the filter (and to Administrator users). No other users or workgroups are granted permissions by default.
Note for version 16.5 Update 11 and later: The Result Set editor UI has been modified so that ticking (or unticking) the check box for a project/folder in the hierarchy also selects it as the active node and hence displays its Sensitivities and Economic Limit settings. In previous versions, the tick action and the select action are independent.
Runs
One run ('Run 1') is automatically added. If you require additional runs, use the Add Run button in the Result Sets tab on the ribbon.
Note for version 16.5 Update 14 and later: There is no limit on the number of Runs that can be included in a Standard Result Set.
For earlier versions, there is a limit of 256 Runs.
Settings that apply to all runs
The settings described in the table below apply to every run in the result set.

| Setting | Description |
|---|---|
| Customize Partners | Checking this box enables you to specify which partners can be included in the result set report by clicking Select.... If you do not check the box, only the main partner will be available. |
| Ringfence | Applies ringfencing to the calculation. Note that the selected projects must be already ringfenced for this setting to take effect (see Apply ringfencing to projects). |
| Disable incrementals | (Added in version 16.5 Update 27) This option will disable incremental calculations for the entire Result Set (in previous versions, disabling incrementals can only be done by manually changing the Incrementals Enabled setting of individual hierarchy folders). The option is active when the Ringfence option is enabled. |
| Align scenarios (unweighted) | (Added in version 16.5 Update 22) The Economics application tenant setting 'EnableUnweightedRingFenceMode' must be enabled by the IPS Administrator for this extra ringfence option to appear. If the box is checked then an alternative calculation mode based on unweighted ringfencing will be used (the inputs to the ringfences are not risked before entering the ringfence calculation). |
| Store all variables for auditing purposes | Stores all of the variables calculated, in the state they were in at the time of calculation. |
| Preserve Calculated Spreadsheets |
(Added in version 16.5 Update 14) Result Set temporary calculation spreadsheets, derived from regime Excel spreadsheets, can optionally be exported for reporting purposes; all of the original Excel formatting and macros will be preserved in the outputs. The role 'Economics/Regime Spreadsheets' must be granted to use this option. Also the Economics application tenant setting 'CalculationSpreadsheetSharedFolder' must have been configured by the IPS Administrator to specify a network file share where the temporary output files will be stored. Please note that calculation performance can be reduced when this option is enabled; also IPS Admins will need to consider the amount of storage needed for the temporary files that will be generated. After the calculation job is completed the saved files will be available as a ZIP that can be accessed through the Task Notification viewer. Change in 16.5 Update 15: if the setting 'CalculationSpreadsheetSharedFolder' is blank then the storage location will default to the tenant 'cluster shared temp folder'; temporary files will be removed as part of the automated IPS cluster shared folder clean-up task. If 'CalculationSpreadsheetSharedFolder' is set to a different location it will be the responsibility of IPS Administrators to ensure that temporary files are regularly cleaned up. Changes in 16.5 Update 31: The Calculated Spreadsheets for a Result Set Run are now persistent after the end of a Planning Space session, and can be accessed using a download button (not in the Task viewer); to download, open the context menu for the run in the Result Sets explorer, and click Download Spreadsheets. Additional controls for Calculated Spreadsheets are now included in the ExecuteSpreadsheet module function: you can specify whether data will be saved for each function call, and the folder location where the saved files will be stored (see Spreadsheets in modules). |
| Preserve Calculated Spreadsheets: Match setting | (Added in version 16.5 Update 31) When Preserve Calculated Spreadsheets is enabled, the additional setting is activated for Match source (default) or Match calculation (Debug). The latter option should be used when the spreadsheets are needed to check or debug the calculations in Planning Space (in this case the downloaded spreadsheets will be identical to those used in the calculations, and for calculation purposes these may have been modified from the original Excel source files); the former option should be used when the original files are required (in this case the Result Set calculated values will be removed, and a recalculation in an external spreadsheet application may produce values which do not match the Planning Space calculations). |
| Switch to recalculate mode |
Checking this box enables you to re-calculate a subset of projects within a previously-calculated result set. This is especially useful if you have a large result set where only a handful of projects have changed since it was last calculated. Note that this option is disabled when:
In recalculate mode only the projects stored in the result set when it was last calculated with the recalculate mode option unchecked will be displayed. All folders and projects are displayed grayed out until they are selected. The selected projects will be recalculated if you click the Calculate button in the ribbon. |
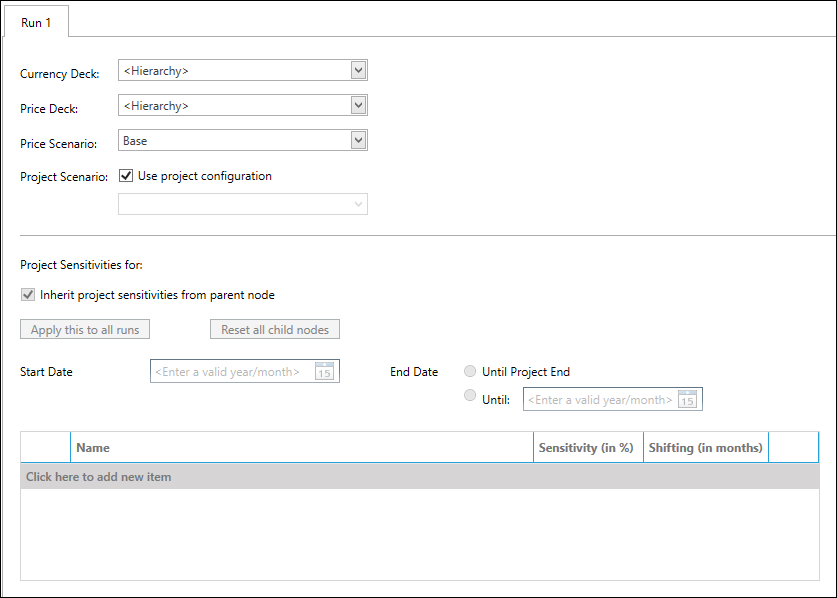
Run-specific settings
Each Run has its own settings as described in the following table.
| Setting | Description |
|---|---|
| Currency Deck | Specifies the currency deck that will be used for the result set run. By default this is the hierarchy currency deck. Use the drop-down menu to select a different global currency deck. |
| Price Deck | Specifies the price deck that will be used for the result set run. By default this is the hierarchy price deck. Use the drop-down menu to select a different global price deck. |
| Price Scenario | Specifies the price scenario that will be used for the result set run. Use the drop-down menu to select another price scenario from the currently-selected price deck. |
| Project Scenario | Specifies the scenarios that will be used for each project. The option Use project configuration will use the scenarios and weightings that have been specified in the project (see Scenario Consolidation Settings). Otherwise uncheck the box and use the drop-down menu to choose a scenario that will be applied to all the projects in the run. |
| Project Sensitivities |
(See explanation below.) |
| Start Date | (See explanation below.) |
| End Date | (See explanation below.) |
Price Sensitivities
The Price Sensitivities setting is available in version 16.5 Update 22 and later.

This setting can be used to add sensitivities for price groups in Price Decks. Click in the text Click here to add new item to open the Select Price dialog and select one or more price groups. Then edit the value in the Sensitivity (in %) column for each price.
You can remove a price row by clicking its red X button.
Project Sensitivities
These settings can be used to apply sensitivities and shifts to variables. They are individually set for each project and folder in the Calculation Hierarchy.
The settings can be different for each run. Use the Apply this to all runs button to copy the settings of the selected run to all of the other runs.
The default behavior is that the settings for any node will be inherited from its parent node, that is, the check box Inherit project sensitivites from parent node is enabled.
To modify the settings for a node, select it (click its name text) in the Calculation Hierarchy. The Project Sensitivities display will show Project Sensitivities for: {NODE NAME} and the node's current settings will appear. Untick the Inherit ... box and insert the settings for the node:
- Start Date and End Date
- Variables table: variables can be included as categories or as specific variables; for each category/variable you need to specify the sensitivity percentage and/or a shift in months.
Use the Reset all child nodes button to force the current node's settings onto all of its child nodes, that is they will have their Inherit project sensitivites from parent node box enabled and any individual settings will be lost.
For version 16.5 Update 9 and later: The Project Sensitivities settings for the currently-selected Result Set run can be exported to an external (XLS) file using the Export Sensitivity Settings button (in the Result Sets tab on the ribbon). The XLS export file contains two worksheets: 'Nodes' and 'Variables'. The 'Variables' worksheet contains a 'Row Id' column, the value of which corresponds to the 'Id' column value in the 'Nodes' worksheet. Use the Import Sensitivity Settings button to apply the settings in a formatted XLS file to the currently-selected Result Set run. The details of the project changes caused by the import will be shown in a Sensitivities Import Log viewer. This will also show any invalid or unexpected data found in the XLS file during import.
Term Variables Sensitivities
Term Variables Sensitivities are available in version 16.5 Update 13 and later.
Economic Limit
The Economic Limit setting is available in version 16.5 Update 10 and later.
This setting can be used to override project-level economic limit settings. It can be set for each node in the Calculation Hierarchy.
The node's setting can be different for each run. Use the Apply this to all runs button to copy the setting in the selected run to all of the other runs.

The default behavior is that the setting for any node will be inherited from its parent node, that is, the check box Inherit economic limit from parent node is enabled.
To modify the setting for a node, select it (click its name text) in the Calculation Hierarchy. Untick the Inherit ... box and choose the setting for the node:
- Use economic limit set in project
- Select the economic limit date: use the Date input box to specify a date
- Use the economic limit date calculated by application
- Ignore the economic limit date and calculate the entire project life
Use the Reset all child nodes button to force the current node's settings onto all of its child nodes, that is they will have their Inherit economic limit from parent node box enabled and any individual settings will be lost.
Calculate the result set
When the settings are complete, click the Calculate  button on the ribbon. Each
Run calculation will be performed as a job on the IPS Server and you can use the Task Notification area at the bottom right of the screen to
follow the progress of the calculations. When each run calculation is complete an alert balloon will appear as shown.
button on the ribbon. Each
Run calculation will be performed as a job on the IPS Server and you can use the Task Notification area at the bottom right of the screen to
follow the progress of the calculations. When each run calculation is complete an alert balloon will appear as shown.

Note: If a calculation job is cancelled the Log Viewer can contain incorrect information because the error message "The calculation was cancelled by user ..." will contain the user account that submitted the job, and not the user that performed the cancellation.
When the calculation job is complete, the run outputs can be accessed by opening the result set in the Result Sets explorer.

Note that the Run icon changes from ![]() for a new and un-calculated
Run to
for a new and un-calculated
Run to ![]() for a calculated run.
for a calculated run.
Now that you have calculated a result set, you can open one of the its Runs and generate a result set report. See Result Set Reports.